Tech Pizzazz
How To Move Your Website From Squarespace To WordPress

Squarespace recently increased its prices, and many business owners are now looking for an alternative platform.
I’m recommending WordPress because it’s open source and gives you far more control over your website. It also makes it easier to keep your long-term website costs low, since you can choose your own hosting provider.
This guide walks you through everything you need to successfully move your website from Squarespace to WordPress.
PS: If you’d like someone to handle the migration for you, reach out via email at wangui@techpizzazz.com, and I’ll help you move your website to WordPress.
One important note: This guide is about WordPress.org, not WordPress.com. Although they share the same name, they’re two different platforms. WordPress.org gives you full ownership of your website and the flexibility to customize it however you want.
If you do it right, you can:
- Keep your SEO rankings.
- Keep downtime to a minimum.
- Continue running your website without missing a beat.
A quick caveat before you begin migrating your website from Squarespace to WordPress
WordPress requires a little more maintenance than Squarespace.
You’ll occasionally need to update plugins, themes, and WordPress itself, and it’s your responsibility to keep regular backups.
That might sound intimidating if you’re new to WordPress, but don’t let it discourage you. WordPress has one of the largest communities on the internet, so if you ever get stuck, you’ll find countless tutorials, videos, forums, and step-by-step guides that walk you through almost anything.
Why should you trust me?
I’ve been hosting my own WordPress websites for over five years, and I also design WordPress websites for clients alongside my content writing work. I’ve gone through this process myself and have helped businesses set up and migrate their websites, so I’ll point out the things that can save you time and help you avoid common mistakes.
A quick crash course on WordPress
WordPress is the software that powers your website. Unlike Squarespace, it isn’t an all-in-one platform, so you’ll need a few pieces working together before your site can go live:
- A hosting provider
- A domain name
- A WordPress theme
- A few essential plugins
If you’re coming from Squarespace, the editing experience won’t feel completely unfamiliar.
WordPress now uses the Block Editor (also called Gutenberg), where pages are created using blocks for text, images, buttons, columns, galleries, and other content. If you’ve used Squarespace’s content blocks before, you’ll pick it up quickly.
Read on to see how to export your site from Squarespace into WordPress.
Before you move your website from Squarespace to WordPress, download a copy of your website and make sure you still have access to your Squarespace account until the migration is complete.
Step 1: Get new hosting
Squarespace currently hosts your website for you. Once you move to WordPress, you’ll need a new hosting provider.
Your hosting is where all your website files live. It is basically the home of your website.
If you’re looking for an affordable option, I recommend Namecheap. I’ve personally used it for years and found it reliable for personal, blog, and business websites.
If your website gets a lot of traffic or you’re expecting it to grow quickly, SiteGround is another good option. It costs more, but it includes extra performance features that can be helpful for larger websites.
Once you’ve purchased a hosting plan, you’ll receive an email with your login details and access to your hosting dashboard.
Step 2: Decide what to do with your domain
If you bought your domain through Squarespace, you don’t have to move it.
You can keep your domain registered with Squarespace and update your nameservers to point to your new hosting provider. Your hosting company will give you the nameservers you’ll need.
If you bought your domain somewhere else, like Namecheap or GoDaddy, the process is the same. Log in to your domain registrar, update your nameservers, and point them to your new hosting account.
Don’t worry if your website doesn’t switch over immediately. Domain changes can take up to 48 hours to fully propagate across the internet.
Ps: Your nameservers tell your domain where your website is hosted. Updating these points your domain to your new hosting account.
Step 3: Install WordPress
WordPress itself is free and open source. If you choose one of the hosting providers we mentioned earlier, installing it only takes a few minutes.
For this guide, we’ll use Namecheap as an example.
- Log in to your Namecheap account.
- Open the Hosting List and click Go to cPanel next to your hosting plan. (cPanel is your hosting control panel where you’ll manage your website.)
- Scroll down until you see Softaculous Apps Installer and click WordPress.
- Click Install Now.
- Choose the domain where you want to install WordPress.
- Leave the installation directory blank unless you want WordPress installed in a subfolder.
- Create your administrator username, password, and email address. Make sure you save these somewhere safe because you’ll use them to log in to your WordPress dashboard.
- Click Install and wait about a minute while Namecheap sets everything up.
Once the installation is complete, you’ll receive a link to your WordPress dashboard. It will usually look something like:
yourdomain.com/wp-admin
This is where you’ll log in whenever you want to update your website.
Your WordPress website is now ready for the next step.
A few things to do before importing your content
Before you move your website from Squarespace to WordPress, it’s a good idea to spend a few minutes setting up your new website.
Choose a theme
Your theme controls how your website looks. Don’t worry about making it perfect yet. You can always change it later. We recommend the default 2025 theme if you want something simple or Blocksy if you want more customization options.
Install a few essential plugins
We’ll cover plugin recommendations later in this guide, but for now, you don’t need to install anything beyond what you’ll use during the migration.
Create user accounts
If other people will help manage your website, create an Editor account for publishing content, and keep the Administrator account for managing the website itself. That way, your admin account stays reserved for tasks that affect your site’s settings and security.
Step 4: Export your content from Squarespace
Squarespace provides an export option, although it’s quite limited.
Your Squarespace website won’t be copied into WordPress exactly as it is.
Your content will transfer, but your formatting, layouts, and custom CSS won’t. You’ll recreate those after the migration.
Here’s what Squarespace exports:
- All your basic pages as WordPress pages.
- One blog page, which appears in WordPress as a page called Blog.
- All the blog posts under that blog.
- Text, Image, and Embed blocks.
- Gallery pages.
Here’s what Squarespace does not export:
- Style changes and custom CSS
- Product pages
- Album pages & Event pages
- Audio, Video, and Product blocks
- Folders and Index pages
To export your content:
1. Go to Settings → Advanced → Import / Export.
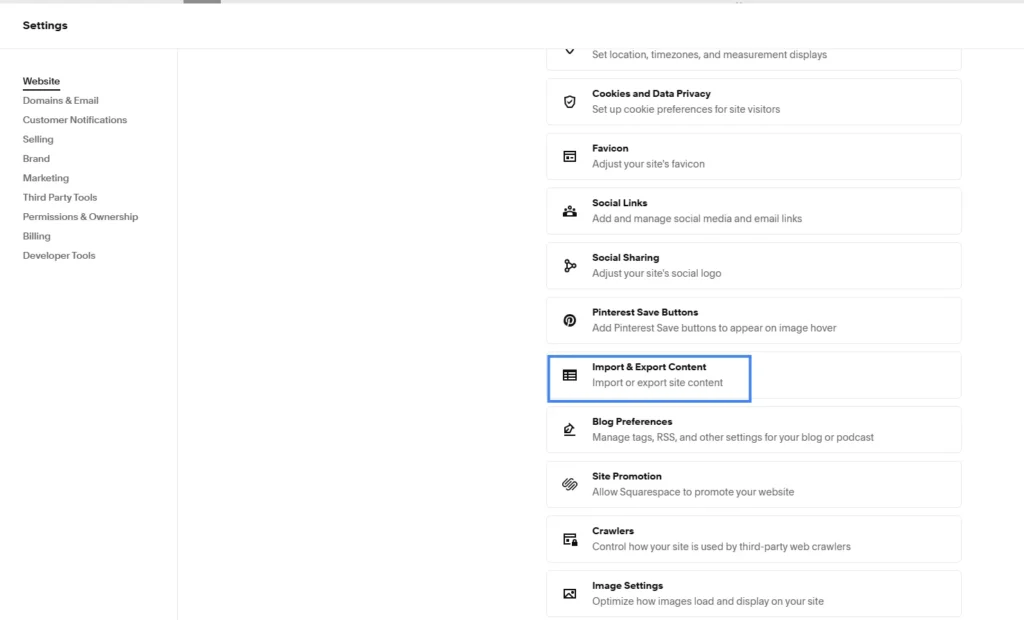
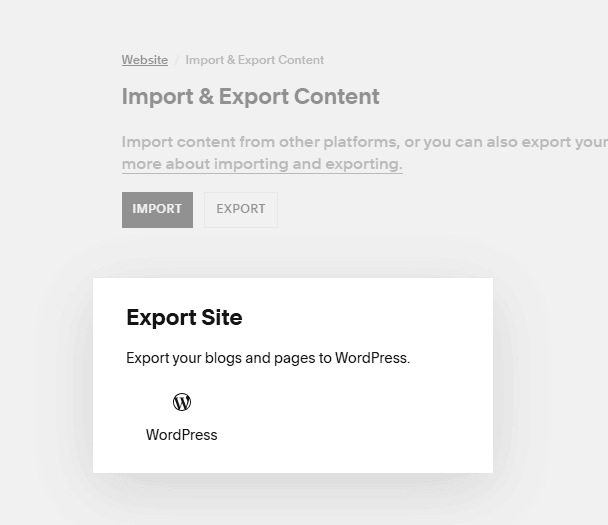
2. Select the WordPress icon. This exports your content in a format that WordPress can read.
3. Click Download.
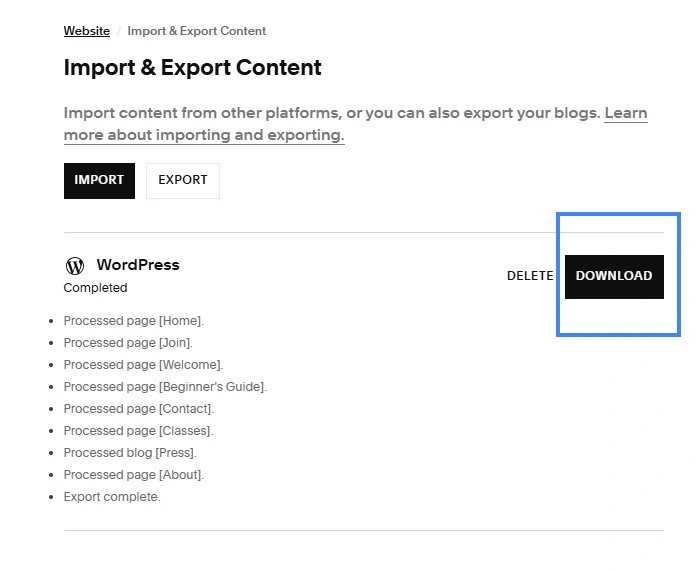
4. Save the exported file in a location you can easily find. You’ll need it in the next step.
Step 5: Import your Squarespace content into WordPress
Now it’s time to move your exported content into your new WordPress website.
1. Log in to your WordPress dashboard by visiting: yourdomain.com/wp-admin
2. In the left menu, go to Tools → Import.
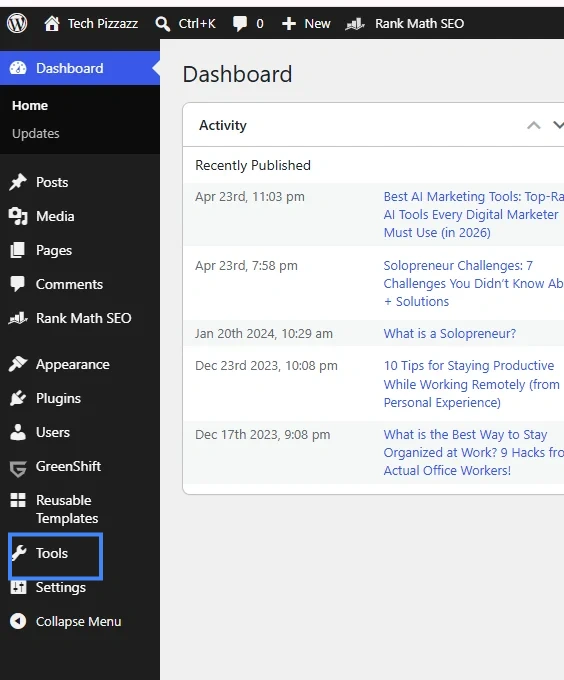
You won’t see Squarespace listed, and that’s completely normal.
Remember, Squarespace exported your content in a WordPress-compatible format. WordPress simply needs its importer to read that file.
3. Find WordPress in the list and click Install Now.
This doesn’t import your Squarespace website yet. It only installs the importer you’ll use in the next step.
4. Once it’s installed, click Run Importer.
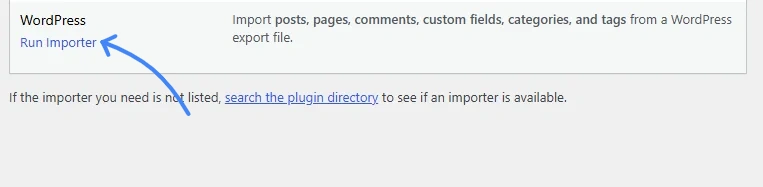
5. Upload the export file you downloaded from Squarespace.
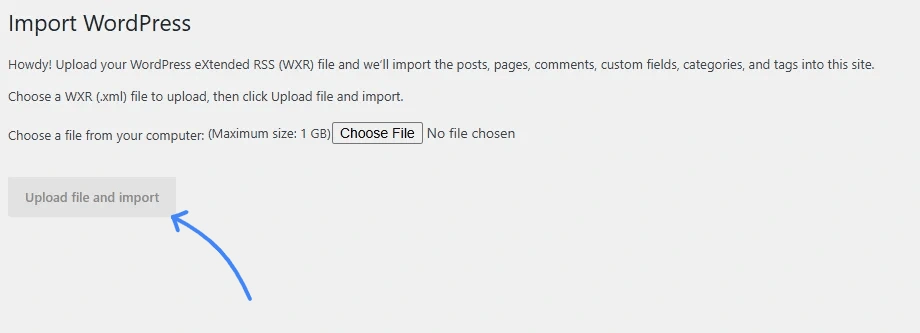
6. Assign an author to the imported content.
7. Click Submit and wait for WordPress to finish importing your pages and posts.
When the process finishes, you’ll see your pages and blog posts inside your WordPress dashboard.
How to import your Squarespace images into WordPress
Your pages and blog posts have now been imported, but there’s one more important step.
Your images are still being loaded from Squarespace’s servers. If you cancel your Squarespace subscription before moving those images into WordPress, they may stop appearing on your website.
The easiest way to fix this is by using the Auto Upload Images plugin. It scans your posts, downloads the images from Squarespace, and saves them in your WordPress Media Library.
Here’s how to use it:
- Go to Plugins → Add New.
- Search for Auto Upload Images.
- Install and activate the plugin.
- Go to Posts → All Posts.
- Click Screen Options in the top-right corner.
- Change Number of items per page to 100, then click Apply.
Processing your posts in batches usually finishes faster and reduces the chances of the process timing out.
- Select all the posts using the checkbox at the top of the table.
- Choose Edit under Bulk Actions, then click Apply.
- Don’t change any of the settings. Simply click Update.
Although you’re clicking Update, your content isn’t being edited.
WordPress is merely saving the posts again, which allows the plugin to download every image and replace the Squarespace image links with copies stored in your own Media Library.
Repeat these steps until you’ve processed all your posts.
After you’re finished, go to Media → Library and confirm that your images are there.
Once you’ve confirmed everything imported successfully, you can safely deactivate and uninstall the Auto Upload Images plugin.
Step 6: Fix your blog URLs (Permalinks)
After importing your content, it’s a good idea to check the URLs of your blog posts.
Squarespace and WordPress don’t always use the same URL structure.
If your blog URLs change, visitors clicking old links from Google, social media, or other websites may land on a 404 Page Not Found error.
Fortunately, this only takes a minute to fix.
- In your WordPress dashboard, go to Settings → Permalinks.
- Open your old Squarespace website in another browser tab and click any blog post.
- Look at the URL.
For example:
https://yourdomain.com/blog/2025/3/6/post-title
The first part after your domain (/blog/ in this example) is your URL prefix. Yours might be blog, news, articles, or something different.
- Return to Settings → Permalinks.
- Select Day and name.
- In the Custom Structure field, add your URL prefix before the default WordPress structure.
For example:
/blog/%year%/%monthnum%/%day%/%postname%/
- Click Save Changes.
Your blog posts will now use the same URL structure as they did on Squarespace. This helps preserve existing links and reduces the risk of visitors encountering 404 errors.
Step 7: Import the remaining content
Remember, Squarespace doesn’t export everything.
You’ll still need to manually recreate or move the following:
- Audio, Video, and Product blocks
- Style changes and custom CSS
- Folders and Index pages
Audio and video
If your website contains audio or video, you’ll need to upload those files to WordPress or embed them again using services like YouTube or Vimeo.
Products
If your Squarespace website has an online store, your products won’t be included in the export.
You’ll need to recreate or import them into WooCommerce, which is an ecommerce plugin for WordPress.
Covering WooCommerce migration properly deserves its own guide, so we’ll save that for another day. (But reach out via email if you need help with moving from Squarespace to WordPress X WooCommerce.)
Step 8: Customize your new WordPress site
At this point, your content has been imported, but your website won’t look exactly like it did on Squarespace.
That’s because the export only includes your content. Your design, layouts, fonts, colors, spacing, custom CSS, and Squarespace-specific features don’t transfer.
Here’s what is usually imported:
- Page titles
- Blog post titles
- Text content
- Basic formatting such as headings, paragraphs, lists, and links
- Images (after you’ve imported them into your WordPress Media Library)
Here’s what you’ll need to recreate:
- Your page layouts
- Your website’s overall design
- Fonts, colors, and spacing
- Custom CSS
- Squarespace-specific blocks such as galleries, forms, maps, newsletters, and buttons
You have two main options.
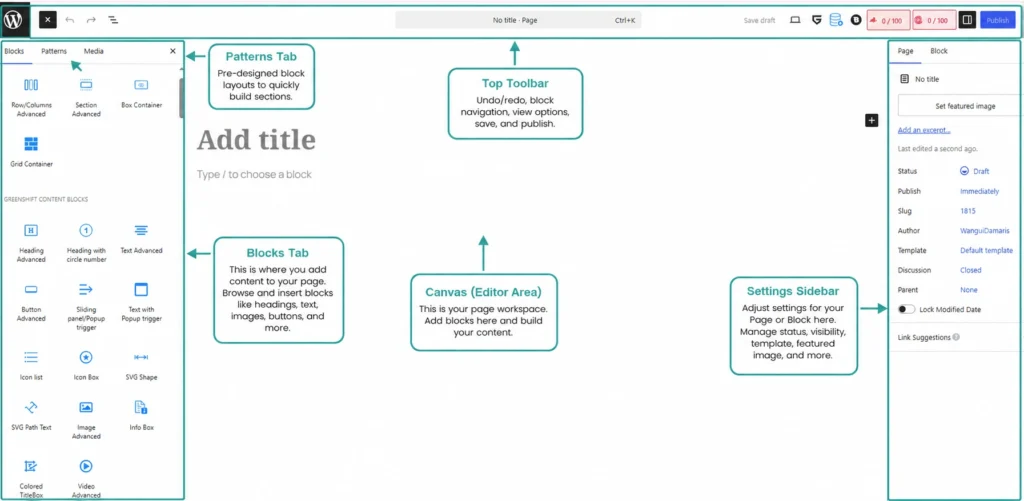
Option 1: Use the WordPress Block Editor (Gutenberg)
The Block Editor comes with WordPress, so there’s nothing extra to install.
If you’re using a block-based theme, it’s all you need to recreate your pages using blocks for headings, images, buttons, columns, galleries, and other content.
Option 2: Use a page builder
If you’d like more design flexibility, you can install a page builder plugin.
Popular options include:
- Elementor
- Beaver Builder
- Divi
These let you design pages using a drag-and-drop editor without writing code.
Once you’ve chosen your editing tool, open your old Squarespace website in one tab and your new WordPress website in another. Go through your pages one at a time and recreate any layouts or features that didn’t transfer during the migration.
Your website should now be fully migrated. The final step is installing a few plugins to keep it secure, backed up, and easier to manage.
WordPress plugins you’ll find useful after moving from Squarespace
Plugins add new features to your website, much like apps on your phone. You won’t need hundreds of them, but there are a few that almost every WordPress website should have.
Here are the ones I’d recommend starting with.
1. Security — Wordfence Security
Wordfence helps protect your website from hackers, malware, and suspicious login attempts.
It can:
- Block malicious traffic before it reaches your website.
- Scan your website for malware and infected files.
- Protect your login page against brute-force attacks.
- Alert you if security issues are detected.
2. Backups — UpdraftPlus
Things don’t go wrong often, but it’s always good to have a backup.
UpdraftPlus creates copies of your website so you can restore everything if an update fails, your website gets hacked, or you accidentally delete something.
It can:
- Schedule automatic backups.
- Save backups to Google Drive, Dropbox, OneDrive, or other cloud storage services.
- Restore your website in a few clicks.
- Download complete backups to your computer.
I recommend setting automatic backups so you never have to think about them.
3. Contact forms — Fluent Forms
Squarespace comes with forms built in. WordPress doesn’t, so you’ll need a plugin if you want visitors to contact you through your website.
I recommend Fluent Forms.
You can use it to create:
- Contact forms.
- Quote request forms.
- Appointment or consultation request forms.
- Newsletter sign-up forms.
- Event registration forms.
- Customer feedback forms.
The free version is enough for the vast majority of business websites.
4. SEO — Rank Math
Rank Math helps search engines understand your website and gives you control over how your pages appear in search results.
You can use it to:
- Edit SEO titles and meta descriptions.
- Generate XML sitemaps.
- Add schema markup.
- Monitor basic SEO issues on your pages.
- Connect your website with Google Search Console.
5. Design — Elementor
The WordPress Block Editor can create beautiful websites, but sometimes you want a little more design flexibility.
That’s where Elementor comes in.
You can use it to:
- Design pages with a drag-and-drop editor.
- Create landing pages.
- Design home pages without writing code.
- Add image galleries, testimonials, pricing tables, FAQs, and other design elements.
- Create reusable templates for different pages.
The free version is enough for most websites, and you can always upgrade later if you need additional features.
Final thoughts on how to move your Website from Squarespace to WordPress
If you follow this guide, you can have your website up and running on WordPress in a couple of hours.
As you work through the migration, pay close attention to broken links, missing images, and your URLs.
Taking extra time to check these can go a long way toward keeping downtime low and preserving your SEO.
If you’re not particularly tech-savvy or simply don’t have the time to handle the migration yourself, I’d be happy to help.
I’m Damaris, a WordPress web designer with over four years of experience using the platform. If you’d like someone to handle the migration for you, reach out via email at wangui@techpizzazz.com, and I’ll help you move your website to WordPress.
Squarespace to WordPress migration FAQs
Can I migrate from Squarespace to WordPress for free?
Yes. WordPress is free and open source, and Squarespace lets you export much of your website content at no extra cost.
You’ll still need to pay for web hosting and, if you don’t already own one, a domain name. If you’re comfortable following this guide, you can complete your Squarespace to WordPress migration yourself without paying for a migration service.
Will I lose my SEO when I move my Squarespace website to WordPress?
Not necessarily.
If you keep the same URLs, import your content correctly, move your images into WordPress, and check for broken links, your rankings should remain largely unaffected.
It’s normal to see small ranking fluctuations after migrating a website, but these usually settle once search engines crawl your new WordPress site.
Can I keep my domain?
Yes. You don’t have to transfer your domain away from Squarespace unless you want to.
You can update your domain’s nameservers so they point to your new hosting provider. Visitors will continue using the same website address after the migration.
How long does a Squarespace to WordPress migration take?
For a typical brochure website or blog, you can complete the migration in two to four hours.
Larger websites with hundreds of pages, ecommerce products, or custom layouts will take longer because some content needs to be recreated manually.
How do I move my Squarespace blog to WordPress?
The easiest way to move your Squarespace blog to WordPress is by using Squarespace’s built-in export tool.
Export your website, import the file into WordPress using the WordPress Importer, then import your images and check your permalink structure. Once you’ve done that, your blog posts will be available in your new WordPress website.
